 I made dial faces for a couple of the square gauges built
in Build Number One. Nearly
ready to install these guys.
I made dial faces for a couple of the square gauges built
in Build Number One. Nearly
ready to install these guys.
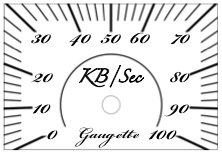
Laying out the line-work on the square faces presents an interesting challenge. I decided to generate the bare line-work programmatically with a ruby script, and add the labels later with a graphics tool.
My first attempt at the script used the GD2 library, but GD2 doesn’t seem to support anti-aliasing or line-caps and the resulting line-work was just too damned ugly. I switched to Cairo which makes pretty, pretty lines. A revelation at this point was that I could use Cairo’s clipping operator to trim the graticule lines and remove the messy trig I was coding to figure out line intersections and stroke lengths. Finally I imported the generated image into OpenOffice to add the text labels.
So what to print on? On a recent trip to Cairns I looked in Officeworks for ideas. I didn’t find any card stock I liked, but I did find some 120 gsm paper (Quill brand “Metallique” in Mother of Pearl) with a cool metallic / opalesque finish. 120 gsm is heavier than standard typing paper, and maybe barely stiff enough to support itself in the gauge. Over time it might curl or slump in the varying humidity here in the tropics. There is just enough drive shaft length to place the paper over the original dial plate so that the needle just clears the face, but if the paper will support itself I could backlight it with an LED which might look nice in the dark.
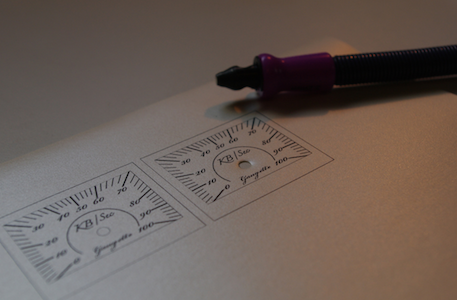 One thing that had me stuffed is how to punch a neat hole in the paper for
the drive shaft. A standard hole-punch makes big holes and can’t reach
far enough from the edge of the paper. Drilling would leave messy edges. Scouring
the aisles at Officeworks I found a
set of three eyelet setters from Fiskars in the scrap-booking section. The hole punches use a crazy spring-driven hammer mechanism, so you can position them anywhere on the page, pull back the hammer, and smack, you have a hole. I reckon I want a 3mm hole, and the middle
size is 3.2mm (1/8”). The downside is the set of 3 cost about $25. Anyway they work a treat and now
I have some crafty hole punches.
One thing that had me stuffed is how to punch a neat hole in the paper for
the drive shaft. A standard hole-punch makes big holes and can’t reach
far enough from the edge of the paper. Drilling would leave messy edges. Scouring
the aisles at Officeworks I found a
set of three eyelet setters from Fiskars in the scrap-booking section. The hole punches use a crazy spring-driven hammer mechanism, so you can position them anywhere on the page, pull back the hammer, and smack, you have a hole. I reckon I want a 3mm hole, and the middle
size is 3.2mm (1/8”). The downside is the set of 3 cost about $25. Anyway they work a treat and now
I have some crafty hole punches.
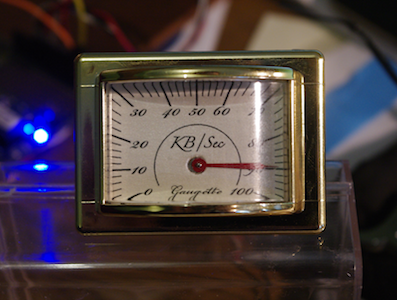 I tried printing the dials with an ink-jet. That
seemed okay until I mounted it in the gauge and I found
that at certain angles the metallic finish
on the paper made the line-work look really washed out. Redoing
the printing with a laser printer gave much better results.
I tried printing the dials with an ink-jet. That
seemed okay until I mounted it in the gauge and I found
that at certain angles the metallic finish
on the paper made the line-work look really washed out. Redoing
the printing with a laser printer gave much better results.
After installing the new face I calibrated it carefully and found a discrepancy between the printed face and needle position that I can’t explain. If I line up zero precisely, then at full-scale (230 degrees sweep) I find the needle is about 2 degrees short of the 100% mark on the dial. I’m not sure what the source of error is - presumably just measurement and positioning errors - but it is easily solved by changing the stepper motor sweep from 690 steps to 696 steps to full-scale deflection.