What Are We Doing Here?
In an earlier post I described how to use the py-gaugette library to drive an Adafruit 128x32 monochrome OLED display from a Raspberry Pi, and a followup article added high-quality fonts.
I’ve now updated the library to run on the BeagleBone Black and to support Adafruit’s larger 128x64 display.
On the BBB py-gaugette uses Adafruit’s BBIO library for SPI and GPIO access.
Preparing the BeagleBone Black
I started with a fresh Angstrom boot image ( the 2013-09-04 eMMC flasher image). After booting from the SD and flashing the eMMC (which takes about 30 minutes), I installed the Adafruit BBIO library following the instructions in their tutorial, which boil down to this:
/usr/bin/ntpdate -b -s -u pool.ntp.org
opkg update && opkg install python-pip python-setuptools python-smbus
pip install Adafruit_BBIO
Make sure you have flashed your eMMC and rebooted into the eMMC image before you run the above steps. If you are still running the eMMC flasher image when you run opkg to install the library, things get weird. Yep, I did that, not proud.
Once you have these packages installed, you might think to look for
/dev/spidevX.Y to verify that the SPI drivers are installed. To my surprise
they don’t show up until you actually run code that loads the SPI library. The
Linux 3.8 kernel uses new and crafty
device overlay trees
to manage devices. The Adafruit library will automatically load the overlay
that creates those devices as necessary, so only if you look at /dev after
running the sample code will you see the spidev device files.
Confused? Let me illustrate.
After a reboot there are no spidev devices:
root@beaglebone:~# ls -l /dev/spidev*
ls: cannot access /dev/spidev*: No such file or directory
Run an application that instantiates Adafruit_BBIO.SPI:
python -c "from Adafruit_BBIO.SPI import SPI; SPI(0,0)"
Look again, there they are, it’s magic:
root@beaglebone:~# ls -l /dev/spidev*
crw------- 1 root root 153, 1 Jan 28 02:25 /dev/spidev1.0
crw------- 1 root root 153, 0 Jan 28 02:25 /dev/spidev1.1
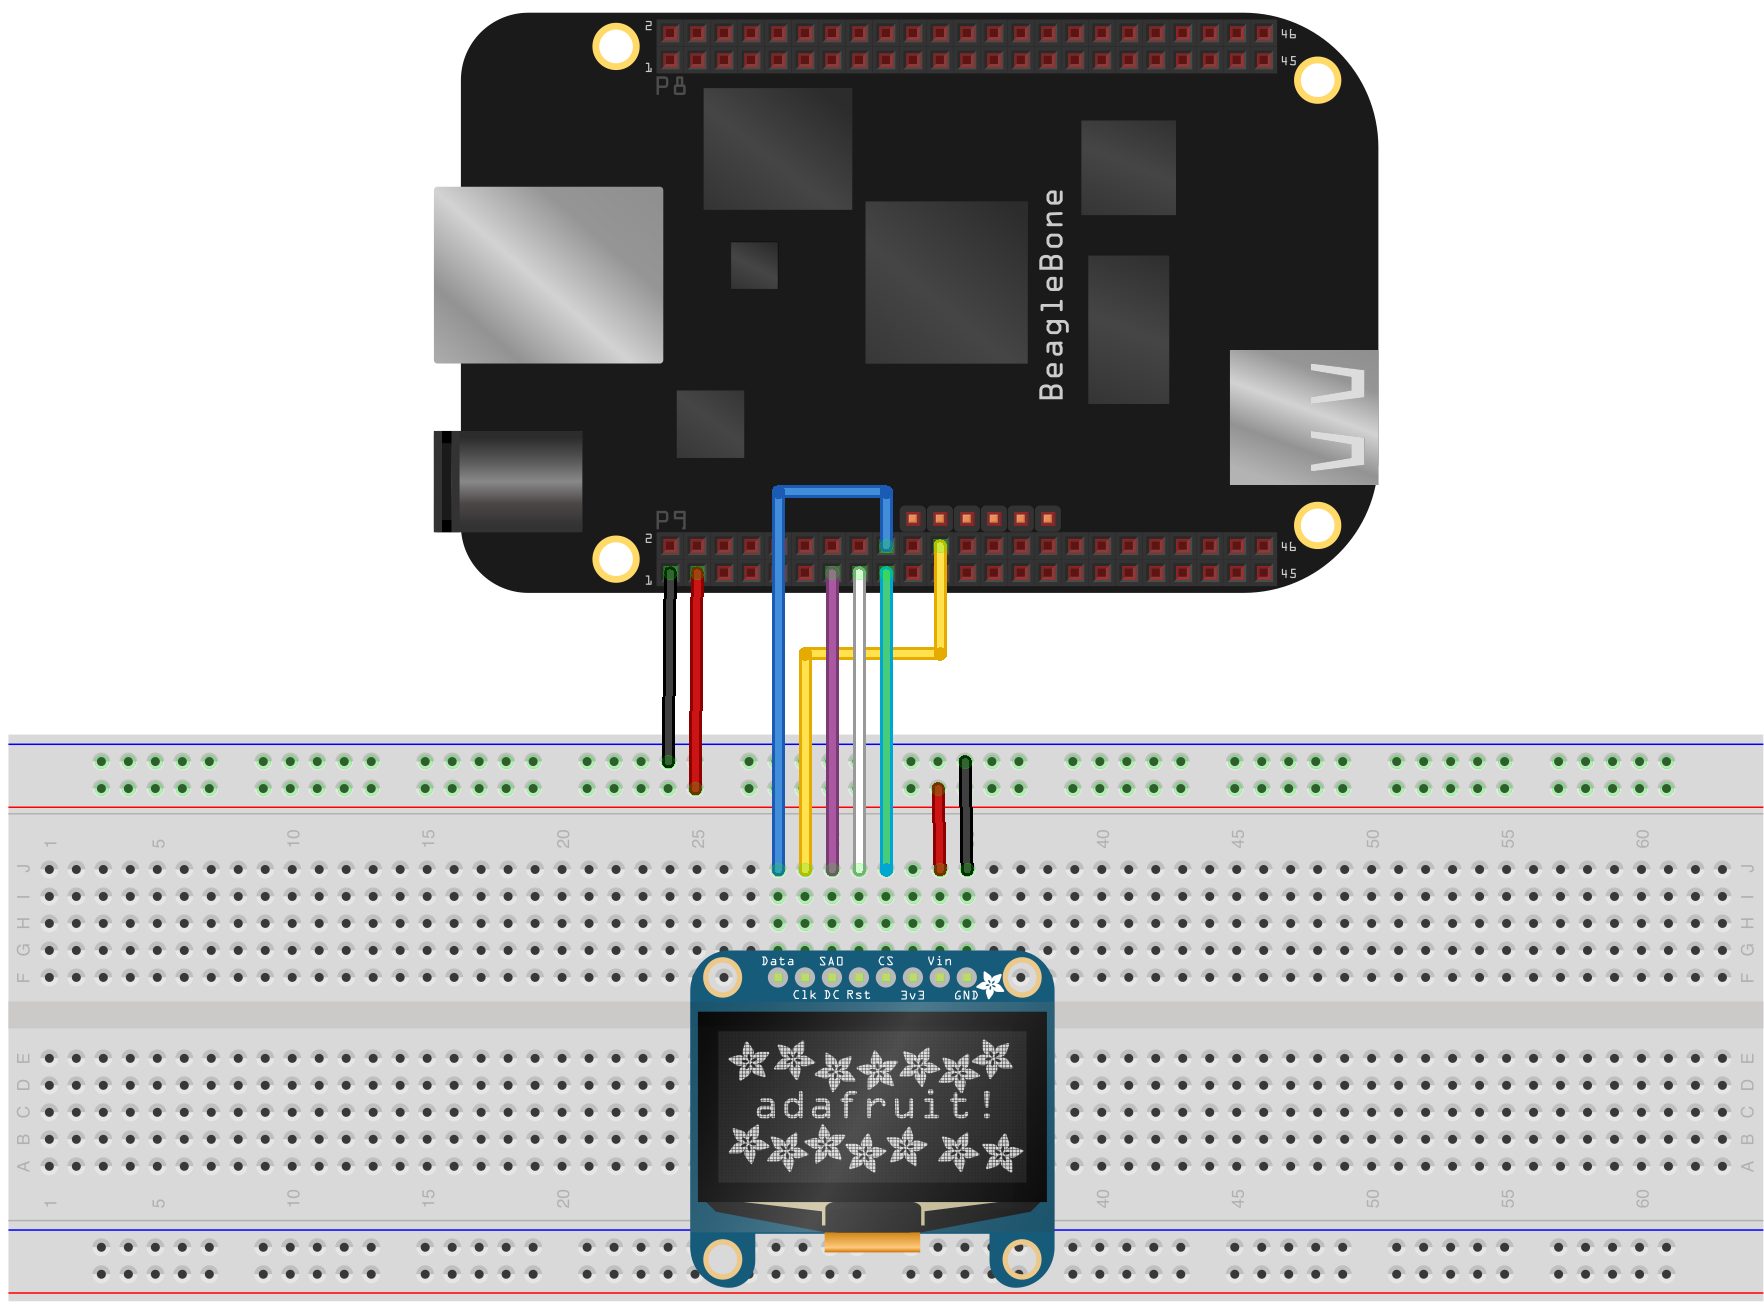
Wire It Up
The BBB has two SPI interfaces. I’m using SPI0. If you want to use SPI1 you will need to follow these instructions to disable HDMI first.
| BeagleBone Black | Signal | Colour | Adafruit OLED |
|---|---|---|---|
| P9_1 | GND | black | Gnd |
| P9_3 | Vcc | red | Vin |
| P9_13 | Data/Cmd | purple | DC |
| P9_15 | Reset | white | Rst |
| P9_17 | Slave Sel | green | CS |
| P9_18 | MOSI | blue | Data |
| P9_22 | Clock | yellow | Clk |
Pins P9_17, P9_18 and P9_22 are fixed by the SPI0 interface. Pins P9_13 and P9_15 are arbitrarily chosen GPIO pins, feel free to use any available pins and pass the appropriate pin name to the constructor.
Porting the Code
Porting gaugette.SSD1306 was straight forward. You can see what was required in this commit.
The only catch getting this running on the BBB was a small bug in SPI_writebytes in the Adafruit_BBIO.SPI module. To refresh the entire 128x64 display we need to transfer 1024 bytes of data. Conveniently Adafruit’s writebytes routine has a maximum transfer size of 1024 bytes. Unfortunately the C code uses an 8-bit counter to store the length, which effectively reduces the maximum transfer size to 255 bytes. For now I’ve worked around that by chunking transfers into 255-byte blocks, and I have filed a bugfix with Adafruit so hopefully we can remove that hack soon.
Update: Adafruit accepted the fix but I will wait until they update the python package currently at 0.0.19 before I remove the workaround.
I can see that maintaining separate branches of py-gaugette for the RPi and BBB is going to be burden, so I’ve now refactored the library to isolate all of the SPI and GPIO dependencies into abstraction classes that will automatically detect the current platform and delegate to the appropriate library. The new classes are gaugette.spi.SPI and gaugette.gpio.GPIO. This change makes all of the gaugette device classes run cross-platform except rgbled, which requires PWM support. I’ll write an abstraction layer for PWM later.
Testing the Display
There are a couple of sample applications in py-gaugette that will let you see your display in action. Note the first line shown below works around an issue with git over https on the BBB, and is only required if you are checking out directly on your BBB.
Install py-gaugette:
git config --global http.sslVerify false  # workaround for https issue
git clone https://github.com/guyc/py-gaugette.git
ln -s ../gaugette py-gaugette/samples   # link library for samples
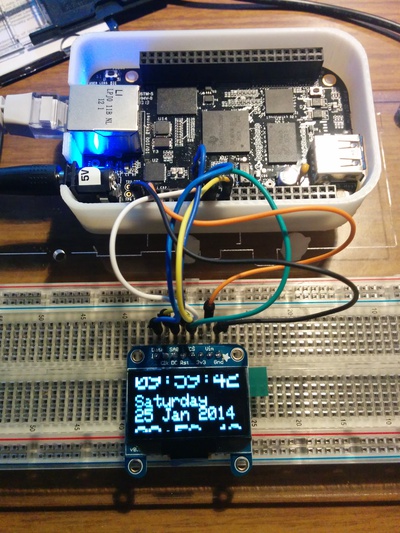
This test shows the current date and time using a low-resolution font.
python py-gaugette/samples/ssd1306_test.py
This test cycles through some of the high-resolution fonts.
python py-gaugette/samples/font_test.py
The python code for creating an instance for a 128x64 display now looks like this:
# This example is for the 128x64 pixel display on the BeagleBone Black
RESET_PIN = "P9_15"
DC_PIN    = "P9_13"
led = gaugette.ssd1306.SSD1306(reset_pin=RESET_PIN, dc_pin=DC_PIN, rows=64)
Notice that pins are identified as strings like "P9_15" on the BBB, which is great for clarity.
The video shows the output of the font test script. This particular sample code was written for a 32-row display where the bottom half of the display memory is off-screen, and so it looks a bit odd on a 64-bit display, but it does illustrate the high-resolution fonts.
python py-gaugette/samples/font_test.py